Gloomhaven is a data-driven game where all the properties and values for the game come from YML files that are defined in the ruleset. Modding in Gloomhaven allows you to alter, remove, or create new YML files in order to change how the game works. This allows you to make customised characters, enemies, cards, items, perks, scenarios, etc.
This document will guide you through what is possible and provide some examples of the types of mods you can make. There is a more detailed YML Parsers section that describes every type of YML file that is supported, what properties can be set on them, and what values those properties can have.
There is also an FAQ at the bottom of this document which we will update over time based on what questions the community asks most commonly.
If you have any questions or suggestions, please join the Discord group and post in the #modding channel.
Overview
Modding in Gloomhaven involves using Mods and Rulesets. Mods alter the game’s standard functionality in some way. Rulesets combine together a collection of mods to create a new set of rules to use for either Campaign or Guildmaster mode.
When you click the Modding button from the main menu, there are three options:
Custom Rulesets
This menu is used to create, manage, and play modded rulesets for either Campaign or Guildmaster mode.
Manage Mods
This menu is used to create or manage mods. You can create new mods here, or view any mods that have been subscribed to in the Steam Workshop (link). You can also see the validity of all mods currently loaded in the game.
Export YML
This button is used to Export all the YML files used by the game. The files will be exported to:
You can use the files exported here to create your own mods for the game.
To create your first mod, click the Export YML button to get all the YML files on your machine. Navigate the menu to Manage Mods and create a new mod. You will be asked to select a name and one of the mod types which are detailed in the next section. When you click edit, you will be taken to the mod's directory. Place all edited and created YML files in the ModdedYML folder.
To start a game with your mod, you need to create a new ruleset in the Custom Rulesets menu first. Select either Guildmaster or Campaign and add your and any other mods to the ruleset. You will need to compile the ruleset before you start playing.
Mods
There are 5 different types of mods that can be created in Gloomhaven:
Global Mod
Global mods must only alter Global YML files. These files are shared between both Guildmaster and Campaign modes and can be used in any ruleset. Global mods do not impact the game outside of rulesets which include them.
In the Export directory, Global YML files are located in the Global and Shared folders.
Campaign Mod
Campaign mods alter YML files specific to the Campaign mode for Gloomhaven. Campaign mods do not impact the game outside of rulesets which include them.
Guildmaster Mod
Guildmaster mods alter YML files specific to the Guildmaster mode for Gloomhaven. Guildmaster mods do not impact the game outside of rulesets which include them.
Language Mod
Language mods add a customised language setting in the Options menu. If a valid language mod is present, this language will be selectable and the game will use the text from that mod. This mod will affect the entire game, including the standard game modes, as well as any rulesets that are played.
Custom Level Mod
Custom Level mods will add single scenarios that can be played via the Level Editor menu.
Note
Global Mods must only use Global YML files. Any other YML files will cause the mod to fail validation.
Rulesets
Rulesets are collections of mods. They can be created and managed in the Custom Rulesets menu. Custom rulesets can be played in both Campaign and Guildmaster modes. The modded game can only be accessed in this menu - the existing games from Guildmaster and Campaign modes cannot be modded.
Any number of mods can compose a ruleset, but a large number may increase compatibility risk. When all mods are ready, the ruleset needs to be compiled. Multiple adventures can be created from the same ruleset.
Mod Guides
This section demonstrates how to create several different mods with examples.
Difficulty Mod
This section demonstrates how to change Difficulty through a mod.
It is not possible to create a new difficulty level through a mod, but all existing ones (Easy, Normal, Hard, Insane) can be modified.
Difficulty YML adds additional rules to selected difficulty levels. It can modify gold, XP gains of mercenaries as well as their health. The number of monsters can be changed indirectly through ThreatModifier. Overall Scenario Level can be changed as well. Finally, the players may be forced to start the scenario with a number of Bless of Curse cards.
Difficulties can affect both Guildmaster and Campaign rulesets.
In Guildmaster ruleset on Easy difficulty, players start each scenario with 2 Bless cards in their attack modifier deck. In this example, the same will be true for Insane difficulty, but with curses instead.
Decide how many cards can the character take to battle.
Choose one of the existing character models to represent the new character.
If you choose Brute, Scoundrel, Cragheart, Spellweaver, Mindthief or Tinkerer, you can choose an alternative skin.
Modify the character's looks with colour and thickness.
Choose if the character will have a companion.
Describe the character and detail its role, difficulty, strengths and weaknesses.
Necromancer.yml
Uses a skinnier Plagueherald's model modified with black colour. He can take 10 ability cards to battle and has a skeleton companion that he starts the game with. He has low health defined within the table. His name, description, role, difficulty, strengths and weaknesses are defined within LangUpdate CSV, indicated by $$.
Create an AbilityCard YML for each available ability card.
Characters in Gloomhaven usually have around 30 ability cards - the number they can take to a battle of 1 level cards, 2 for each level after and 3 X level cards. Necromancer will need a total of 29 ability cards. To start a game, a character would need a number of cards it can take to battle (at least 2).
Modify the card's appearance through the Layout property.
2001_Necromancer_RayOfDecay.yml
Top ability is a range, single target attack that applies 2 conditions on the enemy. Bottom ability is a move that muddles an enemy on a range. The card has a unique ID of 2001 and an initiative of 45. Both top and bottom parts are discarded normally.
Text within $$ references localisations in LangUpdate CSV. Text within ** references an amount specified in the attack, while text within @@ specifies enhancements.
Need localisations for the new enemy ID and new enemy name.
LangUpdate.csv
Localisation for new enemy ID (SoldierID,EliteSoldierID) and enemy name (Soldier,EliteSoldier).
Localisation for new quest to include the new enemy.
Key,English [en-GB]
Soldier,Soldier
SoldierID,Soldier
SoldierElite,Elite Soldier
SoldierEliteID,Elite Soldier
quest_job_soldiers46879321_desc,"Stops Soldiers from a foreign land from invading Demonsgate."
quest_job_soldiers46879321_intro,"A troop of unknown soldiers have entered Demonsgate with conquest on their minds.  Take on an army?  Why not, there must be a reward!"
quest_job_soldiers46879321_list,Clear out the Soldiers
quest_job_soldiers46879321_name,Stop the Invasion
First, decide the threat of the new enemy Normal and Elite. Higher threat means fewer monsters spawned. Generally 25 and 50 are good for most monsters.
Second, create some short, thematic descriptions of the new enemy.
Add a MonsterFamily for the new enemy. Create a DefaultMonsterGroup. Does this enemy usually appear with another enemy?
Create one or more MonsterGroups for the new enemy. In general, MonsterGroup is used more often than MonsterFamily
For MonsterGroup, decide the minimum and maximum chance the enemy will spawn, also how often the enemy will spawn as an Elite.
Monsters.yml
Parser: MonsterData
# Elite IDs do not need to be used in this file.  Only the non-elite IDs for monsters should be used
Threats:
#   Monster Name           [Normal threat value, Elite threat value]
    SoldierID:             [25,50]
#--------------------------------------------------------------------------------
MonsterFamilies:
    Soldier:
        Descriptions:
            Generic: ["Invaders from a distant land", "A well equipped militia group has set up camp", "The area is overrun by soldiers trying to establish a foothold" ]
            Crypt: ["A dusty crypt home to armed men", "Soldiers are making a last stand in this crypt", "Soldiers are searching this tomb for provisions" ]
        DefaultMonsterGroup:
        #   Monster Name:      [Min%, Max%]
            SoldierID:         [50, 75, 12, 25, 50, 75]
#--------------------------------------------------------------------------------
MonsterGroups:
    Soldiers_WithTheirHounds:
        SoldierID:          [50, 75, 12, 25, 50, 75]
        HoundID:            [25, 75, 12, 25, 50, 75]
The enemy has been created and the spawning rules are in place.
Now, the enemy has to be placed into a scenario.
Create a new scenario and use the new MonsterFamily and MonsterGroup just defined.
Scenario_Job_Soldiers46879321.yml
This is a new Job scenario with Soldiers and Hounds
All text will be added through the localisation sheet so place keys in the required places instead.
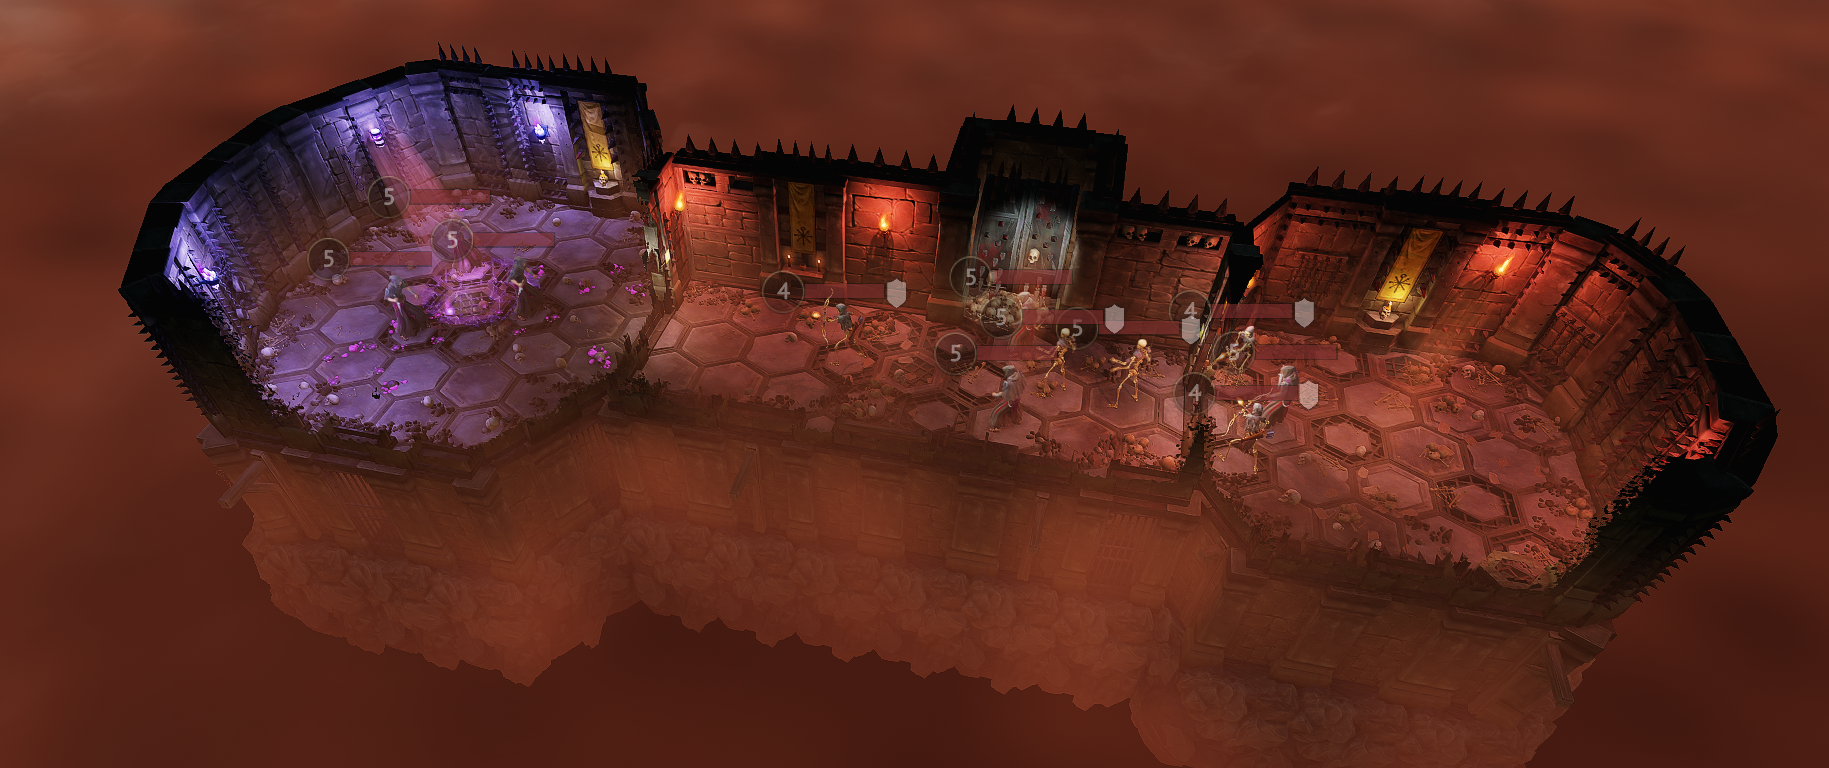
Scenario_Job_SampleDungeon.yml
It is a dungeon filled with Skeletons and Cultists that are summoning Demons through a Spawner. The Objective is to kill all enemies. Additionally, the party discards 2 cards at the beginning of the scenario through a ScenarioAbility triggered by a Scenario Modifier.
Place all rooms on the map. It will not be possible to edit the layout later so choose carefully.
Connect all rooms with doors. Thin doors connect hex's vertices while thick doors connect hex's edges. It will not be possible to edit doors later so choose carefully.
Scenario's visuals can be changed at three levels - Scenario, Room and Prop. By default, props inherit their appearance from rooms that inherit theirs from the scenario. All of those can be overridden though.
Visuals can be affected through five properties - Biome, SubBiome, Theme, SubTheme and Tone. All possible values are present in Apparance Properties table.
This scenario is set up to be a cult's ritual place. It's a dungeon that's last room serves as a demon summoning place. It should be reflected through visuals.
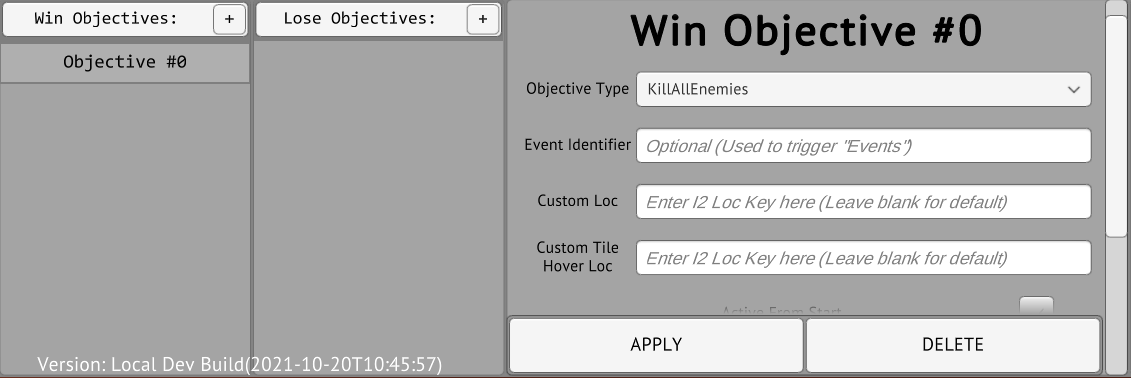
Completing win Objectives is necessary to win the scenario, while lose Objectives end the scenario in a failure.
There are various types of Objectives that can be chosen from the list and further modified by simply changing their values or defining Objective filters.
In this scenario, the Win Objective is to simply kill all enemies.
There are various types of Scenario Modifiers that can be chosen from the list and further modified by simply changing their values or defining filters.
In this scenario, there is a Scenario Modifier that triggers a Scenario Ability at the start of the scenario. The Ability forces each player to discard a card.
Plan out the structure of the event. Usually, it goes something like this: Players are presented with 2 options on the first screen after which they are taken to one of 2 other screens depending on their choice.
Decide if every option of the event is reachable for every party. Some may require specific characters, items or enough gold. If that is the case, see OptionConditions.
All text will be added through the localisation sheet so place keys in the required places instead.
Event_Road_100.yml
In this event, the party encounters a wounded man on the side of the road. They are presented with options to either help the man with a health potion or leave the man. To choose the first option they must have the healing potion in their inventory. The man blesses them after their help. In the second option, the man dies and rises as an undead. The party fights the monster and are wounded and damaged but receive some XP.
Decide what are the rewards or punishment for each chosen option. Those are optional though.
Road Events usually award gold or small items while punishing by dealing damage or applying negative conditions at the start of the scenario.
Event_Road_TreasureTables.yml
As the party offers a healing potion in Option A, the potion is lost. In return, the man awards them with a Bless Condition. In Option B, the party is attacked, the undead deal damage and apply Wound Condition while awarding them with some XP.
As the event is ready it needs to be placed in the Road Event deck somehow. There are two main ways of doing that. It can be unlocked through a TreasureTable placed anywhere in the game or it can be put into the deck at the start of the adventure through InitialEvents YML.
Finally, all text on each of the Screens needs to be filled up. All the keys present in the RoadEvent YML need to be put in the localisation sheet along with a corresponding value.
LangUpdate.csv
Key
English [en-GB]
EVENT_ROAD_100_INTRO
You see a man lying on the side of the road, blood pouring out of his mouth, with a vile wound on his neck. He tries to crawl his way to you not being able to utter a word.
EVENT_ROAD_100_OPTION_A
Offer the man a health potion.
EVENT_ROAD_100_OPTION_A_UNAVAILABLE
Requires: 1 Minor Healing Potion
EVENT_ROAD_100_OPTION_B
Ignore the man and move on your way.
EVENT_ROAD_100_RESULT_A
You helped the man drink the potion, and as he sat up after a while, he told you of the undead he fought. When he finally could move on his own, he muttered something under his breath and took off.
EVENT_ROAD_100_RESULT_B
As you moved along your way, you sensed a brief touch down on your leg after which claws pierced through your skin. When you looked back, you saw the man standing up with a blank stare. He has turned into undead and you have to deal with the aftermath.
When writing a YML file you must first include the Parser: property to specify the type of YML Parser you wish to use. This section contains details on each YML Parser available.
If for example, you wish to add a new Quest then you need to use the Quest Parser. Simply add the Parser property and define Quest at the top of the YML file.
Parser: Quest
HeroSummon
This section details the parser properties available for the HeroSummon YML parser.
Property Name
Data Type
Description
ID
Unique String
Unique Identifier for the HeroSummon.
LocKey
String
HeroSummon's name represented in the User Interface. References a key in the localisation sheet.
Model
String
Determines the appearance of the HeroSummon. Any model used by existing HeroSummons or Enemies is valid.
Attack
Integer or Mapping
Attack action. Draws an attack modifier if applicable and deals damage. Melee by default.
If there is any additional information about the action that needs to be provided, see Enhanced Ability Properties.
The first integer is the threat value of a Normal monster of this Enemy ID
The second integer is the threat value of an Elite monster of this Enemy ID
MonsterFamilies
Mapping
.
UnlockDialogueLines uses the Shared YML Property MapDialogueLines.
The following localisations must exist for each ID (replace [ID] with the new ID value):
The following values are valid:
[ID]_NAME
[ID]_DESC
[ID]_LIST
[ID]_INTRO
MonsterGroups
Mapping
A mapping of MonsterGroup Names.
Each MonsterGroup Name has a mapping of Enemy IDs.
Each Enemy ID has a list of six integers
The first integer is the minimum chance to spawn a Normal monster of this Enemy ID
The second integer is the maximum chance to spawn a Normal monster of this Enemy ID
The third integer is the chance to spawn an Elite monster of this Enemy ID for a one player scenario
The fourth integer is the chance to spawn an Elite monster of this Enemy ID for a two player scenario
The fifth integer is the chance to spawn an Elite monster of this Enemy ID for a three player scenario
The sixth integer is the chance to spawn an Elite monster of this Enemy ID for a four player scenario
Examples
Monster Data
Parser: MonsterData
# Elite IDs do not need to be used in this file.  Only the non-elite IDs for monsters should be used
Threats:
#   Monster Name           [Normal threat value, Elite threat value]
    BanditArcherID:        [25,50]
    LivingBonesID:         [25,50]
#Bosses
    BanditCommanderID:     [75,50]
    UndeadCommanderID:     [75,50]
#--------------------------------------------------------------------------------
MonsterFamilies:
    Bandit:
        Descriptions:
            Generic: ["A hive of villainy", "A group of outlaws have made this area their home", "The local region has been pillaged by Bandits" ]
            Crypt: ["A crypt defiled by Bandits", "Bandits have taken this crypt as their hideout", "Tomb robbers have pillaged this vault" ]
        DefaultMonsterGroup:
        #   Monster Name:      [Min%, Max%]
            BanditGuardID:      [50, 75, 12, 25, 50, 75]
            BanditArcherID:     [25, 50, 12, 25, 50, 75]
    Demon_SunNight:
        Descriptions:
            Generic: ["Demons from another realm walk the land", "Strange creatures have been seen in this area", "Demons blight the land"]
            Crypt: ["A crypt full of Demons, surely treasures await?", "This tomb could hold a portal to another realm", "This crypt must be purged of the demonic hordes" ]
        DefaultMonsterGroup:
            SunDemonID:         [0, 100, 12, 25, 50, 75]
            NightDemonID:       [0, 100, 12, 25, 50, 75]
#--------------------------------------------------------------------------------
MonsterGroups:
#   Monster Group Name:
#       Monster Name:      [Min%, Max%]
    Bandit_WithSomeUndead:
        BanditGuardID:      [50, 75, 12, 25, 50, 75]
        BanditArcherID:     [25, 50, 12, 25, 50, 75]
        LivingBonesID:      [0, 25, 12, 25, 50, 75]
        LivingCorpseID:     [0, 25, 12, 25, 50, 75]
    Bandit_MainlyArchers:
        BanditGuardID:      [0, 25, 12, 25, 50, 75]
        BanditArcherID:     [75, 100, 12, 25, 50, 75]
    Bandit_Forest:
        BanditGuardID:      [25, 75, 12, 25, 50, 75]
        BanditArcherID:     [0,  50, 12, 25, 50, 75]
        HoundID:            [25, 75, 12, 25, 50, 75]
Determines how the treasure is split between the party members.
The following values are valid:
Combined
PerMercenaryInParty
ChapterFilter
Integer
Treasure of with a specified ChapterFilter are rewarded only in those chapters.
SubChapterFilter
Integer
Treasure of with a specified SubChapterFilter is rewarded only in those subchapters.
Modifiers
Sequence
Adds a specified number of selected attack modifiers to the deck.
The following format is valid:
- [MODIFIER_1,AMOUNT_1]
Scalar Values
Scalar values can be used if only one of the mapping properties is used. Depending on their data type and treasure type, they replace one of the mapping properties.
Available For
Data Type
Replaces
Gold
XP
Damage
Prosperity
EnhancementSlots
PerkPoint
Reputation
PerkCheck
Discard
This section details the parser properties of the Achievement YML parser.
Property Name
Data Type
Description
ID
Unique String
A unique identifier for the achievement.
LocalisedName
String
Achievement's name. References a key in the localisation sheet.
LocalisedDescription
String
Achievement's description. References a key in the localisation sheet.
UnlockCondition
Mapping
Determines what triggers the achievement to unlock for completion. If the achievement should not be shown before completion, UnlockCondition should be the same as AchievementCondition.
Determines what triggers the achievement to complete. If the achievement should not be shown before completion, UnlockCondition should be the same as AchievementCondition.
This section details the parser properties available for the Quest YML parser.
Property Name
Data Type
Description
ID
Unique String
The Unique Identifier for Quests. This must be unique to all other quest IDs available.
The following localisations must exist for each Quest ID (replace [ID] with the new ID value):
[ID]_NAME
[ID]_DESC
[ID]_LIST
[ID]_INTRO
Chapter
Unsigned Integer
Which Chapter the quest belongs to.
This can be used when defining Chapter and SubChapter difficulty levels in a Headquarters YML file, and for UnlockConditions that require a set number of quests from a Chapter to be completed.
QuestType
Enum
The QuestType defines which heading in the quest log this quest can be found under, and the map icon used.
The following values are valid:
Story
Travel
Relic
Job
City
IconType
Enum
The IconType is used by Story quests to override the base Story quest Icon to boss or specific character icons.
The following values are valid:
RequiredCharacter
Boss
CharacterIcon
String
This value must be a CharacterID set in a Character YML. It is only used when the IconType is set to RequiredCharacter.
UnlockDialogueLines
Mapping
UnlockDialogueLines uses the Shared YML Property MapDialogueLines.
These dialogue lines are triggered on the map after unlocking the quest.
CompleteDialogueLines
Mapping
CompleteDialogueLines uses the Shared YML Property MapDialogueLines.
These dialogue lines are triggered on the map after completing the quest.
These are requirements for characters in the party to start the quest.
StartingVillage
String
This value must be an ID from a Village/Headquarters YML. It is used to determine the location that the party starts moving from when they start this quest.
EndingVillage
String
This value must be an ID from a Village/Headquarters YML. This is used by Travel quests in Guildmaster mode to determine the Village that should be unlocked once this quest is completed.
LinkedQuestID
String
This value must be an ID from another Quest.
Used in Campaign mode to determine Quests that are linked and do not require the players to return to Gloomhaven before moving onto it.
EventChance
Unsigned Integer List - 8 Entries
A list of 8 Unsigned Integers which determines the chance of encountering a Road Event when on this quest for each scenario level (0-7).
This entry can be left null and the event chance will be retrieved from the Headquarters YML instead.
EventPool
List String
A list of String IDs which reference the Unique IDs of Road Event YMLs.
This entry can be left null and the event pool will be retrieved from the Headquarters YML instead.
Scenario
Mapping
Scenario uses the Shared YML Property MapScenario.
An ID reference to the Scenario YML for this quest and it's location on the map.
LoadoutImageId
String
This string defines the image shown on the customise loadout screen before entering a scenario. List of all Narrative Image IDs.
NarrativeTextImageOverride
List<Tuple<string, string>>
A list of tuples made of two strings. String1 refers to a localisation key for text used by narrative text boxes. String2 refers to a Narrative Image ID to be shown alongside that text.
This section details the parser properties available for the Headquarters YML parser. The Headquarters is the main hub of the game in both Guildmaster and Campaign modes (Demonsgate and Gloomhaven respectively). In practise this parser has many similarities to the Village parser, with some extra data such as ItemMaxStock, Difficulty level related data and tables for XP and Gold gained from scenarios.
Property Name
Data Type
Description
GameMode
String
The GameMode value is used to find the Difficulty settings in the Difficulties YML to use with this Headquarters. Eg, if this is set to Guildmaster it will look for the Guildmaster difficulty settings.
ID
Unique String
The Unique Identifier for Headquarters.
LocalisedName
String
The localisation key for finding the name of this Headquarters Location and displaying it across various UI.
LocalisedDescription
String
The localisation key for finding the description text of this Headquarters Location and displaying it across various UI.
Mesh
String
The ID of the decal to display on the map screen for this location.
MapLocation
List Unsigned Integer - 2 Entries
Two unsigned integers that represent the X and Y coordinates for positioning the Headquarters on the map screen.
JobLocations
Sequence of Unsigned Integer - 2 Entries
Multiple entries of two unsigned integers that represent the X and Y coordinates for possible positions of Job Quest Locations attache to this Headquarters on the map screen.
StreetLocations
[String, int, int]
A string referencing a localisation key for the street name, followed by X and Y co-ordinates for the city map.
Street Locations are shown as labels on the City Map in Campaign mode.
StartingScenarios uses the Shared YML Property MapScenario.
A sequence of ID references to the Scenario YML and it's location on the map.
StartupTreasureTables
String List
A list of string IDs that reference Treasure Tables by ID. These are awarded to the party upon completing the tutorial or when starting the save file if there is no tutorial defined.
These are the quests that are started from this location. In the case of job quests this is the job quests that are possible to appear at this location.
Contains threat modifiers for Chapters and Sub Chapters on each Difficulty level. For example this can be used to reduce the threat level of scenarios in Chapter 1.1 when on Easy mode.
CharacterXPTable
List of Unsigned Integer - 9 Entries
The amount of XP required to reach each level from 1-9
ProsperityTable
List of Unsigned Integer - 8 Entries
The amount of Wealth required to reach each Prosperity level from 2-9
ReputationTable
List of Signed Integer - 11 Entries
Defines the shop price modifier at Reputation Levels ranging from +5 to -5
This section details the parser properties available for the InitialEvents YML parser. InitialEvents represent all Road and City Events that are available from the start of the game.
Property Name
Data Type
Description
RoadEvents
List of Strings
Determines what RoadEvents are available from the start of the game.
This section details the parser properties available for the RemoveYML YML parser. It serves the purpose of removing existing yml files from the modded game.
Property Name
Data Type
Description
FilesToRemove
List of Strings
Determines what files will be removed when the ruleset is compiled. References file names that can be checked in ModdingExport folder.
The following format is valid:
[FileName_1.yml,FileName_2.yml
Remember
All references to removed files must be removed as well.
This section contains commonly used YML Properties used across multiple YML Parsers.
UnlockConditions
This section details the parser properties available for the shared UnlockCondition parser.
Property Name
Data Type
Description
Chapter
List of 2 Integers
Chapter required for the Unlock Condition.
The following format is valid:
Chapter: [CHAPTER_NUMBER,SUBCHAPTER_NUMBER]
Prosperity
Integer
Prosperity required for the Unlock Condition.
Reputation
Integer
Reputation required for the Unlock Conditon.
Gold
Integer
Gold required for the Unlock Condition.
CompletedAchievement
String
References ID of an achievement that needs to be completed for the Unlock Condition.
UnlockedAchievement
String
References ID of an achievement that needs to be unlocked for the Unlock Condition.
UnlockedVillage
String
References ID of a village that needs to be unlocked for the Unlock Condition.
CompletedQuest
String
References ID of a quest that needs to be completed for the Unlock Condition.
UnlockedQuest
String
References ID of a quest that needs to be unlocked for the Unlock Condition.
Retirement
Integer
Represents a number of characters that need to be retired for the Unlock Condition.
UnlockClass
Integer
Represents a number of characters that need to be unlocked for the Unlock Condition.
RequiredHeroes
Mapping
It is a mapping of heroes with corresponding levels. References CharacterID.
The following format is valid:
CHARACTER_ID: LEVEL
Required
Mapping
It is a mapping of Unlock Condition Types with numbers. It represents a number of conditions of the corresponding type that have to be completed for the Unlock Condition.
For example: CompletedQuest: 2 requires completing 2 quests out of a larger list.
It is a mapping of actors or targets that are excluded from a specified action. References IDs of characters.
The following formats are valid:
#Each actor excluding the referenced actor performs the action
ExcludeCharacterID:
    ActorID: ID_1

#Action is performed on each actor, excluding the referenced actor
ExcludeCharacterID:
    TargetID: ID_1
KillInOneHit
Boolean
Used for Kill filter.
Determines if the target/s have to die in one action
The following values are valid:
True
False
Overkill
Integer
Used for Kill filter.
Determines the amount of excess damage that has to be dealt to a target.
Value
Integer
Determines the number of times the targets have to be completed.
AreaEffect
Boolean
Used for UseAbility filter.
Determines if the ability must be an area of effect.
The following values are valid:
True
False
Condition
Conditions
Mapping
It is a mapping of Target or Actor to a list of conditions.
It filters actors that can be used to complete the target by conditions that are applied to them.
The following formats are valid:
#The target has to have those conditions
Conditions:
    Target: [CONDITION_1,CONDITION_2]

#The performing actor has to have those conditions
Conditions:
	Actor: [CONDITION_1,CONDITION_2]
ScenarioResult
String
The target must be completed while either winning or losing the scenario.
The following values are valid:
Win
Lose
Conditional
Mapping
An optional property that can be used for further specification of the target.
There are three possible mappings:
Type
Amount
HPPercentOfMax
Type specifies when the conditional is checked. The following values are valid:
EndScenario
EndRound
ScenarioMinimum
The Amount can be used to express how much damage should be dealt or how far should the character move. The following formats are valid:
"> 1"
"< 2"
">= 3"
"<= 4"
"== 5"
"!= 6"
HPPercentOfMax is similar to Amount but regards only hit points. The following formats are valid:
"> 10%"
"< 20%"
">= 30%"
"<= 40%"
"== 50%"
"!= 60%"
Who
List of Strings
Specifies if the target only applies to certain types of actors.
The following values are valid:
Player
Enemy
HeroSummon
EnemySummon
Ally
Enemy2
Neutral
NotSelf
CharacterTypes
Mapping
Specifies if the target only applies to certain types of actors. Distinguishes between actors performing the action and actors that are targetted.
There are two properties. Both of them are lists of strings:
Actor
Target
The following values are valid for Actor:
Player
Enemy
HeroSummon
EnemySummon
Ally
Enemy2
Neutral
The following values are valid for Target:
Player
Enemy
HeroSummon
EnemySummon
Ally
Enemy2
Neutral
Self
OnlySelf
NotSelf
CauseOfDeath
String
Can be used to further specify how actors should die to fulfil the target.
The following values are valid:
StillAlive
Undetermined
Damage
NoMoreCards
KillAbility
SummonerDied
SummonActiveBonusCancelled
Trap
Suicide
HazardousTerrain
Items
List of Strings
References StringIDs of items that should be used in the target.
The following format is valid:
[ITEM__STRING_ID_1,ITEM_STRING_ID_2]
LootType
List of Strings
Specifies what should be looted to fulfil the target.
The following values are valid:
Chest
GoalChest
MoneyToken
The following format is valid:
[LOOT_TYPE_1,LOOT_TYPE_2]
Slot
List of Strings
Can be used for filters related to items. Indicates a specific inventory slot.
The following values are valid:
Head
Body
Legs
OneHand
TwoHand
SmallItem
The following format is valid:
[SLOT_1,SLOT_2]
Modifiers
List of Strings
Can be used for filters related to attack modifiers. It is a list of all valid modifiers for the target.
The following values are valid:
"*0"
"*2"
"x0"
"x2"
"-2"
"-1"
"+0"
"+1"
"+2"
"+3"
"+4"
The following format is valid:
[MODIFIER_1,MODIFIER_2]
EnemyClasses
List of Strings
Can be used to choose specific enemies for the target. References IDs of enemies.
The following format is valid:
[ENEMY_ID_1,ENEMY_ID_2]
DamageSource
List of Strings
Can be used to choose specific types of damage for the target.
The following values are valid:
Trap
EnemyAttack
EnemyDamage
Wound
Self
Ally
HazardousTerrain
ScenarioElements
The following format is valid:
[SOURCE_1,SOURCE_2]
AbilityTypes
List of Strings
Can be used to choose specific types of abilities for the target.
The target is fulfilled only when specified elements are infused.
The following values are valid:
Fire
Ice
Air
Earth
Light
Dark
Any
The following format is valid:
[ELEMENT_1,ELEMENT_2]
Elements
List of Strings
Can be used to choose specific elements for the target. Useful for Infuse and Consume filters.
The following values are valid:
Fire
Ice
Air
Earth
Light
Dark
Any
The following format is valid:
[ELEMENT_1,ELEMENT_2]
MapScenario
Map Scenario Definition
Property Name
Data Type
Description
EventChance
Unsigned Integer List - 8 Entries
A list of 8 Unsigned Integers which determines the chance of encountering a Road Event when travelling to this scenario for each scenario level (0-7).
This entry can be left null and the event chance will be retrieved from the Quest YML instead.
EventPool
List String
A list of String IDs which reference the Unique IDs of Road Event YMLs.
This entry can be left null and the event pool will be retrieved from the Quest YML instead.
MapLocation
Mapping
MapLocation uses the Shared YML Property MapLocation.
This is the placement of the scenario on the map.
PathDistancePercentage
Float (Range: 0.0f-1.0f)
Used by scenarios on Travel type quests in Guildmaster. Defines the percentage along the pathway between villages that the scenario should be placed.
ScenarioPool
List<Tuple<string, int>>
A list of tuples made of a string and an int. The string refers to the unique ID of a Scenario YML or the name of a scenario built in the level editor. The integer is the chance of this scenario YML being picked from the scenario pool when generating this MapScenario.
MapLocations represent the locations of various elements on the map. MapLocations are always formed by a List of 2 Integers - the first one representing the X axis, and the second one representing the Y axis.
The following format is valid:
[LOCATION_X,LOCATION_Y]
MapDialogueLines
This section details the parser properties available for the shared MapDialogueLines parser.
Property Name
Data Type
Description
Text
String
Represents the text that is displayed in the User Interface when the dialogue line is triggered.
Character
String
Determines who says the text. It is the speaker.
CameraLocation
List of 2 Integers
Determines the place at which camera points when the dialogue line is triggered.
Whenever a condition is applied to the actor, another condition is applied instead. Conditions can be specified with ReplaceCondition and ReplaceWithCondition.
RemoveConditions
Integer or All
Removes a specified number of conditions from the target.
It references the ID of an Ability Card with a Supply property.
AdjustInitiative
Integer
After the beginning of a round, after all ability cards have been revealed, the player may increase or decrease their initiative by a specified number./p>
ImprovedShortRest
None
Makes the short rest give benefits of the long rest.
ItemLock
None
Makes the target unable to use items.
RefreshItems
Int or All
Refreshes a specified number of items. If there are specific slots or states that should be refreshed, see SlotToRefresh and SlotStateToRefresh.
ConsumeItems
Int or All
Forces the player to consume a specified number of items. If there are specific slots that should be consumed, see SlotToRefresh.
SlotToRefresh
List of Strings
Filters items available to refresh by their inventory slot.
The following values are valid:
Head
Body
Legs
OneHand
TwoHand
SmallItem
QuestItem
SlotStateToRefresh
List of String
Filters items available to refresh by their state.
The following values are valid:
Equipped
Useable
Selected
Locked
Consumed
Spent
Active
SlotToConsume
List of Strings
Filters items available to consume by their inventory slot.
The following values are valid:
Head
Body
Legs
OneHand
TwoHand
SmallItem
QuestItem
SlotStateToConsume
List of String
Filters items available to consume by their state.
The following values are valid:
Equipped
Useable
Selected
Locked
Consumed
Spent
Active
ReplaceModifier ReplaceModifiers
List of Strings
Replaces all drawn Attack modifiers of a specified value.
It replaces them with the value of ReplaceWithModifier
ReplaceWithModifier
String
Sets an Attack modifier that will replace Attack modifiers specified with ReplaceModiier/ReplaceModifiers value.
Area of Effect Abilities
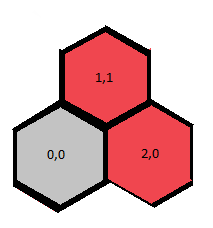
Area of Effect abilities are based on a hex grid as demonstrated below:
Property Name
Data Type
Description
AreaEffect
String
Defines the shape of an AoE ability.
Each hex is represented by their position on the grid, as well as their color. They are separated by '|'.
G (Grey) - The AoE is centered around this position and targetted from this position. Usually it represents the caster. It is optional.
R (Red) - Represents all hexes affected by the AoE.
E (Enhancement) - Represents positions on the grid that are slots for possible enhancements.
Example:
"0,0,G|2,0,R|1,1,R"
AreaEffectLayoutOverride
String
Allows for a different layout to be shown on the ability card.
It is structured the same way as AreaEffect.
IgnoreParentAreaOfEffect
Boolean
If true, ignores the caster when determining targets for an Area of Effect ability.
The following values are valid:
True
False
Active Bonuses
Property Name
Data Type
Description
Behaviour
String
Determines what the active bonus does.
The following values are valid:
BuffAttack
BuffHealPerActor
BuffHealPerAction
BuffRange
BuffTarget
ShieldIncomingAttacks
Retaliate
PreventAndRetaliate
MultiplyAddedConditions
EndTurnAbility
StartTurnAbility
OverrideAbilityType
ShieldTargetedAttacks
ShieldAndRetaliate
CastAbilityFromSummon
DuringActionAbility
BuffMove
ShieldAndDisadvantage
DefaultToggleBehaviour
BuffIncomingAttacks
BuffRetaliate
PreventAndApplyToActiveBonusCaster
DuringActionAbilityOnAttacked
BuffIncomingHeal
DuringActionAbilityOnKill
DuringActionAbilityOnMoved
AdjustInitiative
DuringActionAbilityOnAttackFinished
DuringActionAbilityOnAttackStarted
AdjustWhenAttacked
FocusInitiative
ApplyConditionalConditions
StartActionAbility
EndActionAbility
DuringActionAbilityOnLongRest
DuringActionAbilityOnDeath
StartRoundAbility
EndRoundAbility
DamageOnCurseModApplied
StartTurnAbilityAfterXCasterTurns
DuringActionAbilityOnDamaged
BuffLoot
DuringTurnAbility
DamageOnReceivedDamage
AddAccumulativeOverhealAndHealIfMax
SetMinimumOverheal
PreventDamageByDiscardingPlayerCards
LimitLoot
Duration
String
Determines the duration of an active bonus.
The following values are valid:
Ability
Round
Persistent
Summon
Turn
Restriction
String
Restricts the use of an active bonus.
The following values are valid:
OncePerAction
OncePerTurn
OncePerRound
Requirement Requirements
List of Strings
All requirements have to be fulfilled for an active bonus to trigger.
The following values are valid:
ElementConsumedThisAction
OnYourTurn
ValidActorInRangeOfAddedAbilityRange
EnteredHazardousTerrain
EnteredDifficultTerrrain
ElementStates
ForgoTopAction
ForgoBottomAction
ActiveSpawnersInRange
LootInRange
TriggerAtSetTrackerIndex
ValidActorsInRangeOfRequirementRange
InactiveSpawnersInRange
The following format is valid:
[REQUIREMENT_1,REQUIREMENT_2]
AttackType
String
Determines types of attacks that the active bonus works on.
If True, the card is given to another actor instead.
The following values are valid:
True
False
StartsRestricted
Boolean
If True, the active bonus cannot be triggered the same turn it was played.
The following values are valid:
True
False
EntireAction
Boolean
If True, the bonus applies to the entire action when it is triggered.
The following values are valid:
True
False
SetFilterToCaster
Boolean
Can be used to set Filter to the caster when the active bonus is placed on another actor.
The following values are valid:
True
False
TriggerOnCaster
Boolean
Can be used for Dooms with active bonuses. This way only the caster can trigger them.
The following values are valid:
True
False
TrackerTriggerIndex
Integer
Indicates the index of an XPTracker array on which the active bonus is triggered.
RequiredStrongElements
List of Strings
Requires selected elements to be Strong to trigger the active bonus.
The following values are valid:
Fire
Ice
Earth
Wind
Dark
Light
Any
The following format is valid:
[ELEMENT_1,ELEMENT_2]
RequiredWaningElements
List of Strings
Requires selected elements to be Waning to trigger the active bonus.
The following values are valid:
Fire
Ice
Earth
Wind
Dark
Light
Any
The following format is valid:
[ELEMENT_1,ELEMENT_2]
RequiredInertElements
List of Strings
Requires selected elements to be Inert to trigger the active bonus.
The following values are valid:
Fire
Ice
Earth
Wind
Dark
Light
Any
The following format is valid:
[ELEMENT_1,ELEMENT_2]
ListLayoutOverride
List of 2 Strings
Can be used in ScenarioAbilities to override their text.
The first string represents text and the second string is an icon name.
The following format is valid:
[TEXT,ICON_NAME]
AuraTriggerAbilityAnimType
String
Sets an animation type for the aura.
The following values are valid:
AnimateAuraOriginator
AnimateAuraReceiver
AnimateBoth
RequirementRange
Integer
Used for ValidActorsInRangeOfRequirementRange requirement to determine the required range.
Augments
Ability Properties
Property Name
Data Type
Description
Augment
Mapping
Augment mapping properties are presented below.
TransferAugments
Boolean
If true, augments can be utilized by the controlled actor.
The following values are valid:
True
False
AddAugment
Integer
By default, a character may have only one Augment in play. If a second Augment is played, the previous one is discarded. This property adds a number of possible Augments that can be in play.
Augment Properties
Property Name
Data Type
Description
AugmentIsBonus
Boolean
It should be set to true if Augment's abilities include an ActiveBonus
The following values are valid:
True
False
Type
String
Determines the types of attacks that the Augment is applied on.
It is a mapping of Abilities that are performed when Augment is activated.
AbilityOverrides
Mapping
It is a mapping of AbilityOverrides that override original attacks when using the Augment.
Songs
Ability Properties
Property Name
Data Type
Description
Song
Mapping
Song mapping properties are presented below.
AddSong
Integer
By default, a character may have only one Song in play. If a second Song is played, the previous one is discarded. This property adds a number of possible Songs that can be in play.
It is a mapping of Abilities that are performed when Song is activated.
AbilityOverrides
Mapping
This mapping of abilities override original abilities when the Song is activated.
Dooms
Property Name
Data Type
Description
AddDoomSlot
Integer
By default, a character may have only one Doom in play. If a second Doom is played, the previous one is discarded. This property adds a number of possible Dooms that can be in play.
TransferDooms
Integer
Transfers an indicated number of Dooms to another target. If the value is -1, all Dooms are transferred instead.
AddDoom
Mapping
Adds a Doom to the target. It holds a mapping of abilities.
Allows the caster to perform extra actions at the end of their turn.
The following values are valid:
TopAction
BottomAction
BothActions
BothActionsLater
MonsterAction
BothActionsLater is not performed until the new leading initiative is reached in the order. The new initiative has to be greater than the old one.
Swap
True or Mapping
Swaps positions of two targets.
If there is additional filtering of the targets required, mapping can be used.
It has two properties:
FirstTargetFilter
SecondTargetFilter
RedistributeDamage
None
All damage taken by the caster and its summons may be redistributed. Damage taken while redistributing cannot exceed the target's hit points.
Null
None
Consumes ability requires a parent ability to work. If there is no clear parent, Null can serve as one as it does nothing.
NullTargeting
None
Some abilities may require a parent target. If there is no ability linked with targetting, NullTargeting can serve as a method of targetting without any functionality on its own.
ImmunityTo
List of Strings
Gives a target immunity to all selected ABILITYTYPES.
StatIsBasedOnX changes various values depending on other values. They can affect ability stats as well as base stats with slight differences. It is a mapping that can be demonstrated this way:
Wherever there is text present in any YML parser, the localisation key may be used instead. To use a key, put it between $$ - for example $KEY$. Instead of having a fixed text in the game, one can now put this key (without $$) in the LangUpdate.csv in the LangUpdates folder within the mod and add text for each language. The in-game text will then be dynamically assigned depending on the user's settings.
Layout
This section details the parser properties available for the shared Layout parser. The Layout is used to determine the appearance of an ItemCard or AbilityCard. The Layout consists of rows and columns filled with text and icons. Columns and Rows cannot exist on the same level. The text can be modified using TextMesh Pro's Rich Text.
$LocKey$ is replaced by the value corresponding to the LocKey's key in the localisation sheet.
*Ability* is replaced by Ability's Amount.
@Ability@ is replaced by Ability's Enhancements.
Property Name
Data Type
Description
ColumnSpacing
Integer
Determines the space between columns.
ColumnWidths
String
Determines the width of each of the columns.
The following format is valid:
"COL_1_WIDTH,COL_2_WIDTH"
Column
Mapping
The number of columns depends on the number of entries within ColumnWidths.
That number must be exactly the same.
The columns may consist of text, icons or other Layout properties. They may be left empty as well.
Row
String
The most basic Layout element.
It is a single String containing text to be displayed in a single row on the card.
The text can be modified using TextMesh Pro's Rich Text.
Active
Mapping
Should be used to structure Active Abilities.
The mapping has 7 properties:
Ability - List of Strings, should reference any linked abilities
Layout - Mapping, the actual Layout, can consist of any Layout properties
LayoutAlt - Mapping, the alternative Layout, can consist of any Layout properties
ListLayout - List of Strings, each String represents a single row.
ListLayoutAlt - List of Strings, alternative ListLayout
Icon/Icons - List of Strings, references icons' names that should be used in the Layout
HideTracker - Boolean, determines if the XPTracker is hidden
Summon
Mapping
Should be used to structure Summon Abilities.
Adds a table with the Summon's stats.
The mapping has 3 properties:
Ability - String, references name of the Summon Ability.
SummonName - String, name of the summoned Monster
SpecialText - String, text displayed in the last column in the table
Augment
Mapping
Should be used to structure Augment Abilities.
The mapping has 5 properties:
ParentAbility - String, references name of the Augment Ability
ActiveBonusLayout - String, text displayed on the darkened part of the card
AugmentAbilityLayout - Mapping, the actual Layout of Augment Ability of the parent, can consist of any Layout properties
NormalContentLayout - Mapping, the Layout of any Abilities that are part of the parent Ability but are not Augment, can consist of any Layout properties
AugmentIcon - String, represents the icon shown on the Layout of Augment Ability
Doom
Mapping
Should be used to structure Augment Abilities.
The mapping has 5 properties:
ParentAbility - String, references name of the Doom Ability
ActiveBonusLayout - String, text displayed on the darkened part of the card
DoomAbilityLayout - Mapping, the actual Layout of Doom Ability of the parent, can consist of any Layout properties
ReminderTextOverride - String, text displayed at the top of Doom Ability
DoomIcon - String, represents the icon shown on the Layout of Doom Ability
Song
Mapping
Should be used to structure Song Abilities.
The mapping has 4 properties:
ParentAbility - String, references name of the Song Ability
ActiveBonusLayout - String, text displayed on the darkened part of the card
SongAbilityLayout - Mapping, the actual Layout of the Song Ability of the parent, can consist of any Layout properties
SongIcon - String, represents the icon shown on the Layout of Song Ability
Consume
Mapping
Should be used to structure Consume Abilities.
The mapping has 2 properties:
Name - String, references the name of the Consume Ability
Text - String, should explain what the Ability does in case the element is consumed
Infuse
String
Displays a corresponding elemental infusion icon.
The following values are valid:
Fire
Ice
Earth
Air
Dark
Light
Duration
String
Displays a corresponding duration icon.
The following values are valid:
Ability
Round
Persistent
Summon
Turn
XP
Integer
Displays XP icon along with specified XP amount.
XPTracker
String
References name of an Ability that uses an XPTracker.
Level Editor
The Level Editor is a tool embedded in the game client with which one is able to create and design custom scenarios. These can be played singleplayer or with friends online, shared to the Steam Workshop, or bundled in with modded Campaigns.
Designed primarily for use by the devs, it can at times rely on a cursory understanding of the game code - but that said, once some of the more complex principles are de-mystified (and rough edges accepted) it can become a very powerful tool!
Getting Started
To access the Level Editor, one can navigate via the Main Menu using the "Level Editor" button. This will take you to a screen where one decides on which Ruleset to use.
Having chosen a Ruleset, you now have access to the custom Level browser where a list of your created levels are shown and available for editing. This should all be self-explanatory really, but the "Use Default Levels folder" changes the saving behaviour of levels somewhat.
Using the default level folder
If the toggle is on, the list shown will populate from files found in this location. Newly created levels will be saved here too:
While this toggle is on, each custom level will be saved into its only folder with accompanying meta data that is essential for uploading to the Steam Workshop.
Using a custom level folder
If the toggle is off, you are able to enter your own file path into the provided text field which will be verified and saved for future use by pressing the "Set custom levels folder" button.
While using a custom folder, the level is not saved with any of the accompanying meta data and cannot be uploaded to the Steam Workshop unless manually copied into the default folder and resaved with the default levels folder toggle on.
Want to create a new level? Press the "Create new Level" button to be taken to the Level Editor.
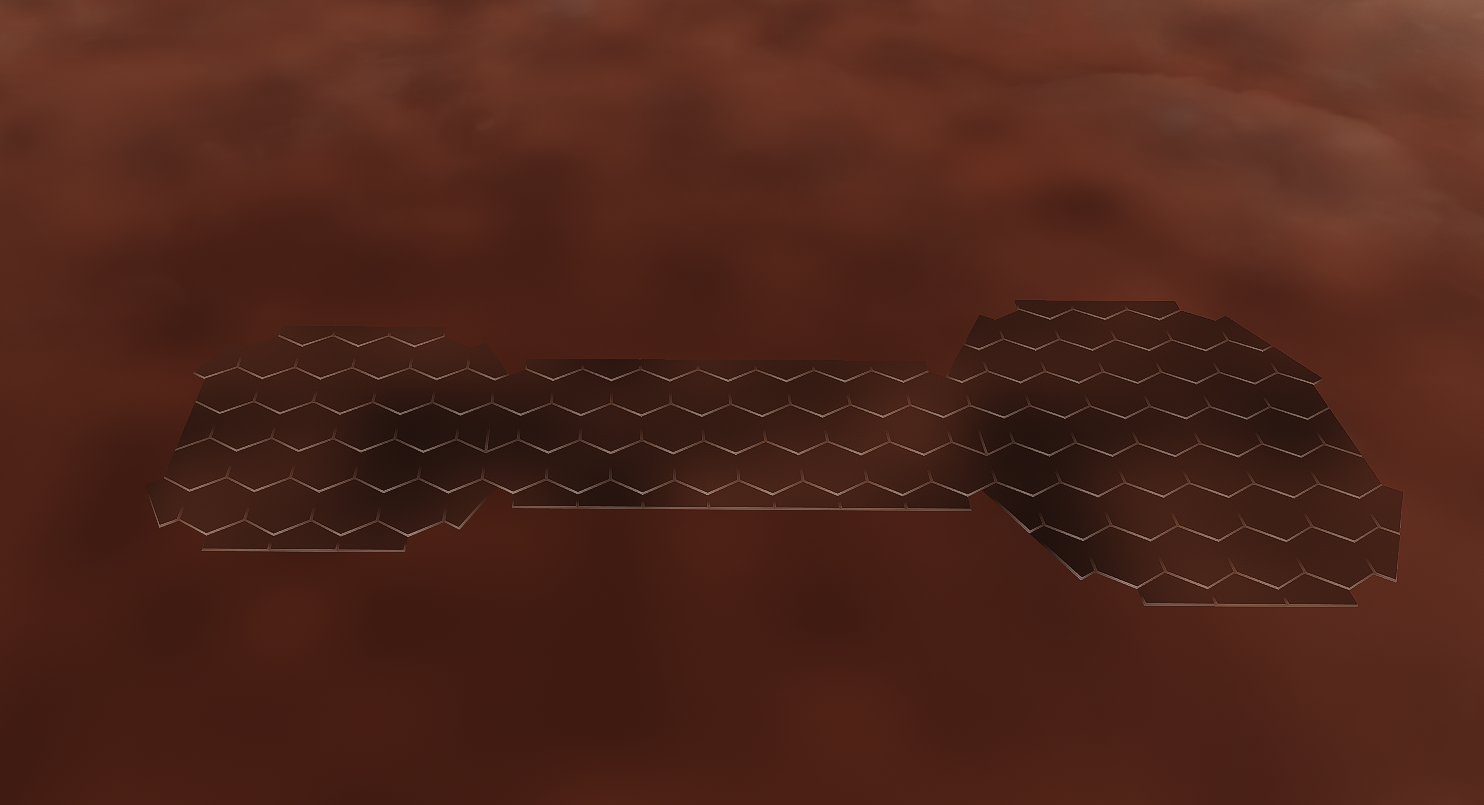
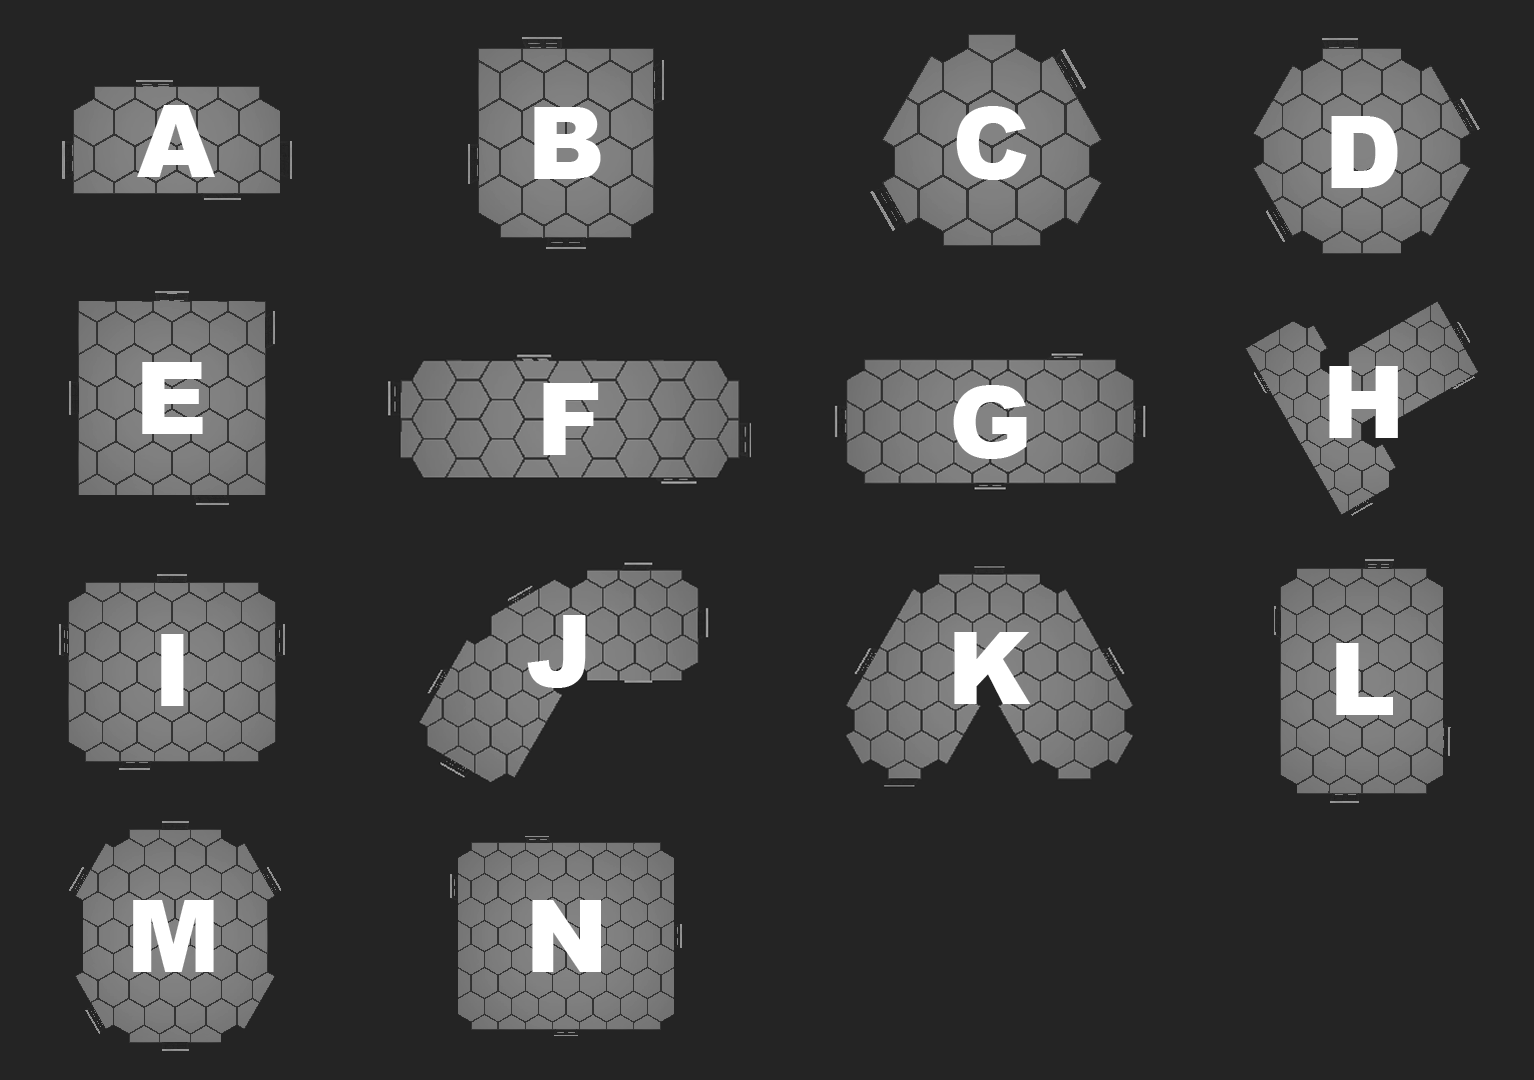
Laying out the rooms
The first step in the level creation is the scenario's layout. On the right, one can see available room shapes and letters associated with them. Select one of the rooms from the list on the left and click the '+' button, which will show a preview of the room. Move it and place it in an appropriate spot. Right click will undo the action.
The room can always be deleted later by selecting it from the list under the creation. In that menu, the room's visibility and name can be changed as well. On the right, biomes and themes can be selected. Click 'Complete Room Placement', when all of the rooms are ready.
The next step is to place doors. Select one of the doors from the list and click the '+' button. It will be possible to rotate the door after it is placed. The only way to rotate the doors is through the vertices of the tile it is placed on, it cannot cut the edges of the hex. Click the 'Complete Door Placement' button when all rooms are connected.
Basic Level Data
Base Data
A name can be given to the scenario in this section.
Party spawn type list determines how mercenaries will be chosen to play this level. LoadAdventureParty will let the player choose from one of the existing Guildmaster or Campaign parties. PresetSpawnAtEntrance will let the player select starting location for mercenaries specified in the scenario and PresetSpawnSpecificLocations will make all mercenaries start in a set tile. LoadAdventureParty requires at least one existing party to load the level, while the latter two require at least one character inside the level.
If LoadAdventureParty is selected, it is possible to adjust monsters' level and hit points to the party's level.
The level can be saved and played from this tab.
Spawn Data
Shuffle settings can be selected in this tab. If enabled attack modifiers decks (P - Players, M - Monsters) and ability card decks (Monsters only) will be shuffled.
Start Tiles
Depending on how the party is spawned, starting tiles may be necessary to set. Click the 'Select Tile' button and pick one of the tiles to add it to the list. Repeat, until all starting tiles are chosen. They can always be deleted in the menu on the right.
Map Data
Optionally, an icon for the scenario can be selected in this tab. Click the '+' button, select an icon from the list and a preview will be shown.
The Characters Tab
Mercenaries available in the scenario can be specified and adjusted here. Click the '+' button and all existing characters will appear. Select one of them and place it on one of the tiles.
By selecting one of the characters on the left, one can modify it. In the menu on the left, the character's level and health can be specified. It can also be deleted or moved there.
In the Item, Ability Deck and Attack Modifiers tab, specific cards can be picked for the particular scenario. Pick them from the list and click the '+' button. They can always be deleted by clicking the '-' button. Ability Card and Attack Modifier availability can be specified as well. For example, a character may start with some of the cards discarded.
Remember
If LoadAdventureParty is selected, do not add any characters to the scenario. Otherwise, there has to be at least one character in place.
The Monsters Tab
Similarly to characters, click '+' to add an enemy and select one from the list.
In the menu on the left, one can specify their level and health. Some enemies may not be revealed. If that is the case uncheck the checkbox. Monsters do not need to be enemies. Tick 'Ally' or 'Neutral' to specify that. Depending on the size of the party, there may be a disparity in the number of enemies. In the size configuration, select if a monster appears as normal, is hidden or is an elite for each of the party sizes.
Ability Cards and Attack Modifiers can be removed from the monster's deck by clicking '+' and '-' and selecting a card. Any changes to Attack Modifiers apply to ALL enemies.
The monster can be set to focus a specific character or an object. In that case, select Override Type from the list in AI focus override list and pick one of the actors or props by looking up its unique key.
Monsters' statistics can be further modified by the number of mercenaries in the scenario or by the scenario's level. Click '+' button in the 'BasedOnX' Entries list, choose one of the stats and how it will be overridden.
The Spawners Tab
Click the '+' button to add a spawner. Spawners will spawn enemies continuously at a specified point in time. That point can be the start of the round, end of the round or both of them.
They become active either at the start of the scenario or once the door gets opened. A specific round can be set to start spawning as well.
If the loop pattern is switched off, the spawner will activate only once.
Spawn Round Interval determines the frequency of spawning, depending on the size of the party.
On the right, specific monsters can be set to spawn from the spawn, depending on the size of the party. The spawner may optionally not spawn anything, or spawn a bear trap.
The Objects Tab
Objects share most of the properties with monsters. Click the '+' button to add an object and select one from the list.
In the menu on the left, one can specify their level and health. Some objects may not be revealed. If that is the case uncheck the checkbox. Objects do not need to be enemies. Tick 'Ally' or 'Neutral' to specify that.
Ability Cards and Attack Modifiers can be removed from the object's deck by clicking '+' and '-' and selecting a card. Any changes to Attack Modifiers apply to ALL enemies.
The object can be set to focus a specific character or an object. In that case, select Override Type from the list in the AI focus override list and pick one of the actors or props by looking up its unique key.
Objects' statistics can be further modified by the number of mercenaries in the scenario or by the scenario's level. Click the '+' button in the 'BasedOnX' Entries list, choose one of the stats and how it will be overridden.
The Props Tab
Click the '+' button to add props into the scenario and select one from the list.
Some of the props can be looted. If one wants them to be looted only by using an ability card, tick Ignore End-Of-Turn Looting.
To make props attackable, tick Prop Has Health. Health may be specified for each of the party sizes. Custom Loc Key lets one choose a unique name for the prop that will be looked up from the localisation sheet. Its actor type determines who is able to attack it. On Death Behaviour specifies what the prop does when its hit points are reduced to 0. It can either activate or be destroyed. An icon can be selected for the prop from the list. Health can optionally be based on scenario level and mercenary count.
If the prop does not have health, it normally can be destroyed or moved with ability or item cards. To disallow that, tick the appropriate box.
Props can be deactivated for specific party sizes.
Their appearance can be modified by selecting a specific biome and theme, that will override the one of the scenario.
Prop
Description
Gold Pile
Generic gold pile. Looting adds gold, depending on scenario level.
Chest Goal Chest
Looting a chest adds a specified amount of gold and XP. A particular treasure table can be linked to the chest. The chest can contain items that can be added from the list.
Trap
Trap deals damage depending on the scenario level. It can also be changed to a flat amount. The trap may also apply conditions that can be selected from the list.
Obstacles
Blocks movement.
PreassurePlate
Preassure Plates can be linked to doors. It will be possible to open the doors only after all linked plates are pressed.
Terrain Hot Coals Terrain Thorns
Hazardous terrain that does damage equal to half of the trap damage on that scenario level.
Terrain Water Terrain Rubble
Difficult terrain that halves the movement speed.
The Element Infusions Tab
If one wants the scenario to start with an infused element, it is possible to achieve in the Element Infusions tab.
Select one of the elements and click the '+' button. The chosen element is now strong. Clicking '-' makes it waning and then inert.
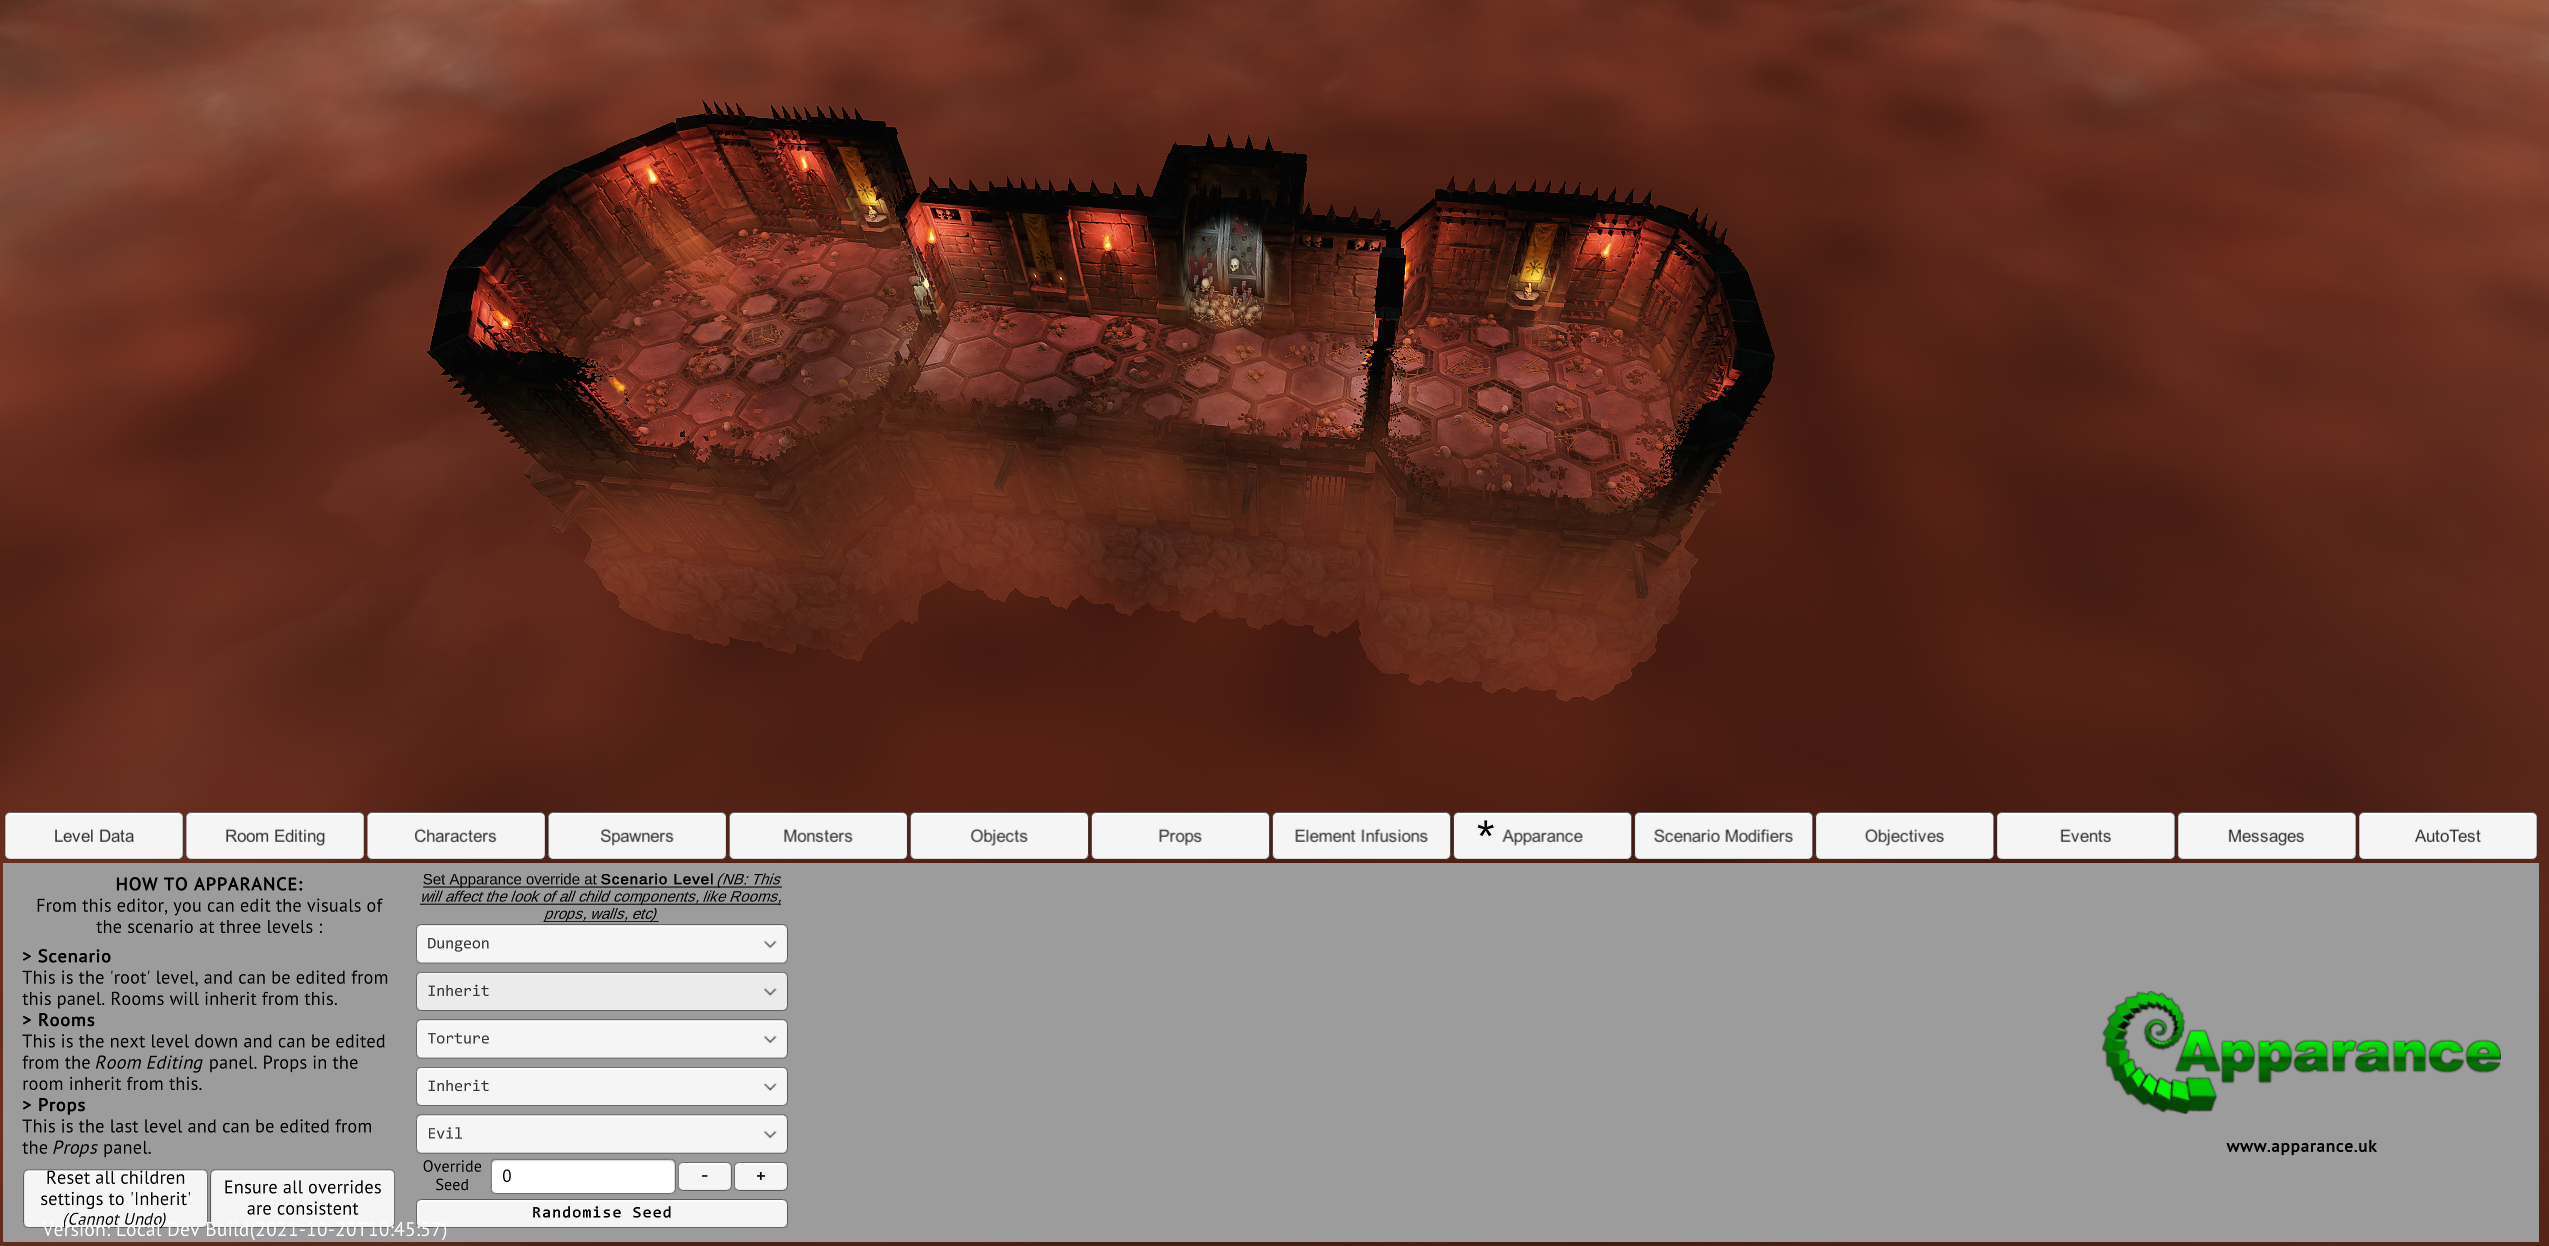
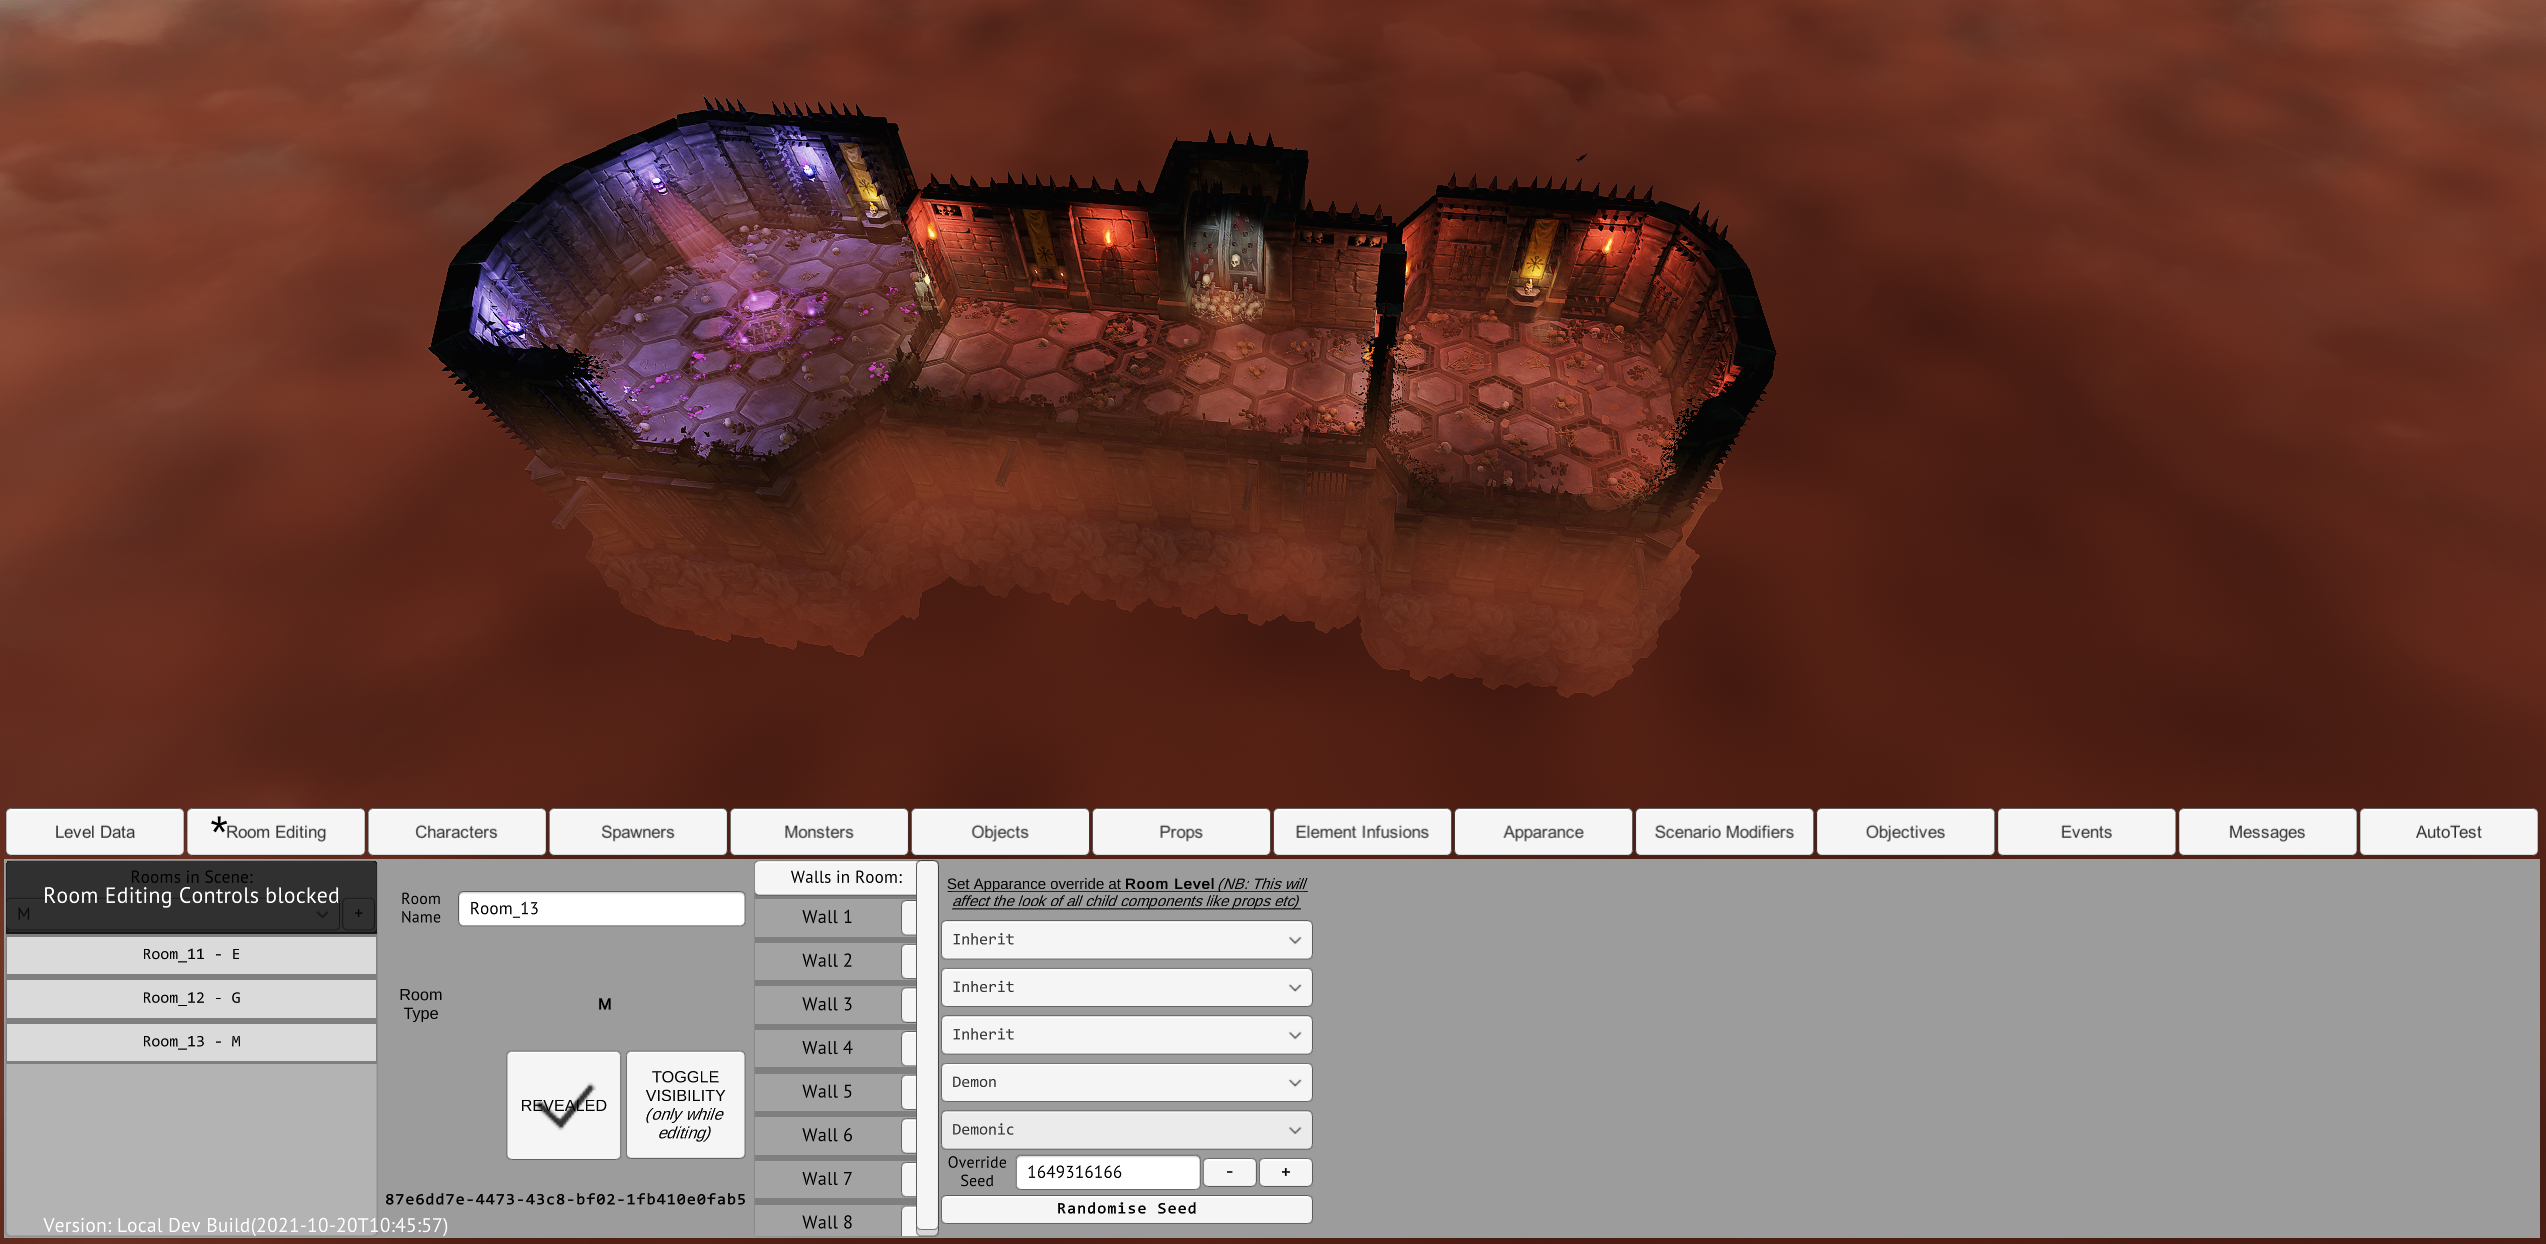
The Apparance Tab
The visuals of the scenario can be changed at three levels. The lowest is the Scenario level, which can be edited in the Apparance tab. Room Level by default inherits from Scenario level. Any changes made on the Room level override the Scenario level. It can be edited in the Room Editing tab and set for each room separately. Prop level inherits from Room level. Any changes made on Prop level override both Room and Scenario levels. They can be set for each prop separately in the Props tab.
Room and Prop level can be reset to 'Inherit' by clicking the button on the bottom left. The look can be further changed by modifying the seed using current settings. The seed can be randomised by clicking the button.
The Scenario Modifiers Tab
Scenario Modifiers change the basic rules of the scenario. They are activated in a specific round or at the beginning of the scenario. They apply a specific change to included actors or set the element infusions. Localisations may be added. Setting Event Identifier exposes the modifier in the Events tab for use.
In the Objective Filter section, one can specify which actors the modifier will affect, for example only players or only Living Bones.
Modifier Type
Description
Set Elements
Ticking any elements in the Element States section will set the element when the modifier triggers.
Trigger Ability
When the modifier triggers, all included actors perform a specified ability, for example, Shield 1.
Add Conditions To Abilities
In the Conditions section, a set of conditions can be chosen to be applied when selected actors perform abilities.
Apply Condition To Actor
In the Conditions section, a set of conditions can be chosen to be applied to selected actors.
Apply Active Bonus To Actor
After the modifier triggers, an ability is applied to selected actors as an active ability.
Add Modifier Cards
Adds specific Attack Modifier cards to decks of all selected actors.
The Objectives Tab
Completing either win or lose objectives ends the scenario. They can be set in the Objectives tab.
Click the '+' button next to either Win Objectives or Lose Objectives to add one. Select one of the objective types from the list. Some objectives like ReachRound or ActorsEscaped require further specifications - in that case, round number and escape tiles respectively.
Objectives can be exposed to the Events menu by setting an Event Identifier. Some events may not be active from start, which requires activation via event. Objectives may be hidden or optional.
If the objective includes any actors, they can be further filtered in the Objective Filter section.
The Events Tab
Events change the state of the game when they occur. Their triggers can be much deeper than those of Scenario Modifiers. There are two types of Event Triggers - SEvents (Scenario Events) and UIEvents (User Interface Events). SEvents trigger when something happens directly inside of the game, for example, an enemy dies. UIEvents, on the other hand, are connected to the user interface and trigger when the player interacts with it, for example when an actor is selected.
Click the '+' button to add a new event. Choose one of the event types from the list. Decide if an event is a one-off or will be repeated. If that is the case tick the box. Depending on the selected event, additional information may be required.
Choose between SEvent and UIEvent and select one of the triggers from the list. If the trigger concerns an actor, a specific one can be selected. Some events may require messages to be shown. Put the name of those messages in the Required Played Messages text box. If the event must be triggered before a message is shown, put the name of that message in the Required NOT Played Messages text box.
The Messages Tab
If one wants to inform the player what is happening in the scenario, messages come in handy. Click the '+' button next to Messages in Scene to add a message.
A unique name could be used to reference the message in the Events tab later. Select the Message Type, which will determine what the message looks like. Title Key refers to a key in the localisation sheet. If the message should not be displayed straight after the trigger occurs, choose a delay. The message can pause the game until it is dismissed.
Pages represent text that will be shown to the player. If there is more than one, the player will be able to scroll through them. The actual displayed text must come from the localisation sheet with a key referenced in the Page Text Key text box. The Check Locale button can be used to check if the key exists within the sheet and what it represents. Optionally, a page can display an image which path should be referenced in the Image Path text box.
In the Interact Limiting section, one can specify what the user can do while the message is displayed until it is dismissed.
Display Triggers define an event trigger that displays the message. When the Exit Trigger occurs, the message is dismissed. Optionally, this can be achieved through Dismiss Button.
Camera Profile may force the camera to look at a specific angle. If it is desirable, tick Should Force Camera. The easiest way to set the camera view is to move it within the editor and click Get From Current button. Optionally, all values can be typed in manually.
It it possible to use my own models/animations/sound?
Is is not currently supported or planned.
Can I change X through mods? It's not in any of the parsers.
Modding only supports creating/modifying/removing YML files as well as changing localisation. If it is not in the documentation, there is a good chance it is not possible. Anything that would require additional code is unlikely.
My files don't work, what should I do?
YML Parsers are very sensitive to line spacing. Consider installing a good text editor like Sublime, Notepad++ or VS Code. Avoid Notepad! If the issue does not involve spacing, you can ask on the modding channel on our Discord!
I downloaded a mod from Workshop and it doesn't work, what can I do?
Some of the mods on the Workshop may be outdated. Mods from Early Access are still available there, so look at their last update. There is a chance they were created using the old Modding System and are no longer supported.

